Zoals beloofd is hier dan eindelijk de tutorial van mijn vilten kadozakje. Met dank aan mijn dochter die haar exemplaar beschikbaar heeft gesteld als voorbeeld.
You need: A piece of felt, 30 cm long and 10 cm wide. 2 pieces of felt 11 cm long and 4.5 cm wide. A button, and of course needle and thread.
Je hebt nodig: Een stukje vilt van 30 cm lang en 10 cm breed. 2 stukjes vilt van 11 cm lang en 4,5 cm breed. Een knoop, en natuurlijk naald en draad.

Put the small pieces of felt on the big piece like the picture above.
Start sewing on the spot in the picture above. This can just like my daughter did with the blanket stitch, or do like I did earlier with the machine.
Leg de kleine stukjes vilt op het grote stuk zoals de foto hierboven.
Begin met naaien op de plek die op de foto is aangegeven. Dit kun je zoals mijn dochter heeft gedaan met de festonsteek doen of zoals ik eerder heb gedaan met de naaimachine.
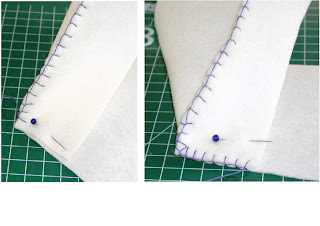
 When you reach the corner you turn the big piece of felt so that youre little piece located right on the edge. As in the picture.
Wanneer je bij de hoek bent draai je het grote stuk vilt zo dat je het kleine stukje recht op de rand hebt. Zoals op de foto.
 If you have sewn it all together and you can finish the bag with the button. Do not forget to make the buttonhole. You can finish this, but leave it there. Felt does not crack through.
Als je alles aan elkaar hebt genaaid dan kun je het zakje afwerken met de knoop. Vergeet niet het knoopsgat te maken. Deze kun je afwerken, maar ook zo laten. Vilt scheurt niet door.
Now you can the gift bag decorate with embellisment.
Hopefully my description is clear, if not, please leave a message so I can adjust my description.
Nu kun je het kadozakje naar wens versieren met embellisment.
Hopelijk is mijn beschrijving duidelijk, zo niet, laat dan een berichtje achter zodat ik mijn beschrijving kan aanpassen.

No comments:
Post a Comment